Incident Management System (IMS)
User Guide
Version 2.2.1
Introduction and Purpose
Customer service and communication are critical components to a student transportation operation’s success. This mindset applies to service and communication with all drivers, monitors, operations staff, transportation managers, students, parents, campus administration and district leadership. At times, incidents will present themselves which need to be accurately recorded and communicated. In order to assist with the management of these incidents, TransPar uses a proprietary system called “IMS,” or the Incident Management System.
IMS gives transportation operations the ability to record, track, and tabulate complaints and accidents in a consistent manner, along with the ability to sort and make reports for internal and external use. The system is designed to create a trail for management and staff to view and follow-up with ongoing issues. Use of the system provides greater opportunity to ensure that the most critical incidents, or inquires requiring follow-up, do receive the attention and response they require. Once an issue is resolved, it can be “closed” and a resolution can be communicated to the parent, campus administrator, community member, or other relevant stakeholder.
IMS is not intended to be used as a phone log for every call that is received by the Customer Service representative or designated member of the transportation team taking phone calls. Instead, the system is intended to record incidents and complaints, as opposed to queries and general information. At times, the difference between an incident and an inquiry can be confusing. In general, if a question can be sufficiently answered over the phone on the first call, there is no need to create an entry into the system as an incident, since no follow-up is required. Repeated issues, such as a bus running late for example, can be considered incidents or complaints in need of follow-up, and should be entered into the system.
It is imperative that every issue which can be considered a complaint or incident is recorded as an entry in IMS immediately. Naturally, the transportation team cannot follow-up on issues that are not present in the tracking system. A lack of follow-up has the potential to lead to poor customer service to parents, students, campus administration, and district leadership. In the fast-paced environment of student transportation operations, a pattern of poor customer service interactions can lead to a loss of trust from parents, the district’s community, and the district’s leadership in the transportation department’s ability to provide safe and reliable services at the highest levels possible. Consistent use of IMS clearly documents the transportation department’s commitment to not only ensuring that critical incidents and complaints are resolved in a timely manner, but a commitment to better understanding the types of incidents and complaints it is receiving over time, in an effort to eventually make proactive attempts to prevent the same issues from occurring in the future, where and when possible.
What to Record
Again, this system is not a phone log for all calls. The purpose is to record, prioritize, assign and track actual complaints rather than simple routine inquiries. On the complaint side it is sometimes difficult to describe exactly what a complaint is versus an inquiry or question, particularly at the start of the school year. For example, questions such as, “What time is the bus coming?” or “Where is my stop?”, are simple inquiries that do not constitute a complaint per se.
A basic rule of thumb is that if the person who takes the call can answer the question while on the phone, completing a ticket in the IMS system is not warranted.
However, calls which concern a bus that is consistently late to a stop or school, an issue with a particular stop location or assignment, a complaint about the unsafe operation of a bus, and similar issues are examples of bona fide complaints and should be logged into the system with answers to be given as soon as possible. This typically will require some investigation and a subsequent call-back to the caller.
Historically, the biggest issue which thwarts the effectiveness of IMS has been complaints that are not recorded into the system. This results in issues being inadvertently dropped (especially during peak busy periods), missed follow-up and duplicated complaints made to different people, often with the caller getting different answers. Moreover, complaints cannot be efficiently referenced for future action and trends, or specific issues cannot be evaluated later, unless tickets are consistently entered into IMS.
Managing the System
Managers should constantly remind staff to keep the system up and active on their computers. Accordingly, monitoring the use of the IMS program is crucial. Managers need to review the day’s activity, especially at the start of the school year, follow-up on priority complaints and ensure that staff are following up on open tickets assigned to them.
A suggestion here is to designate a certain period each day for call-backs and follow-up and have staff take 30 minutes to do all of their call backs and closing out of complaints in the system. 30 minutes will not be a sufficient amount of time every day, especially at the beginning of the school year, but setting aside even a small amount of time to follow-up on and close out tickets will reduce the number of tickets that remain open on a daily basis.
Logging into IMS
IMS is a web-based system and can be accessed from any device that is connected to the internet. To access IMS, users will go to the following link: https://app.transpargroup.com/login, which will bring them to the following login screen:
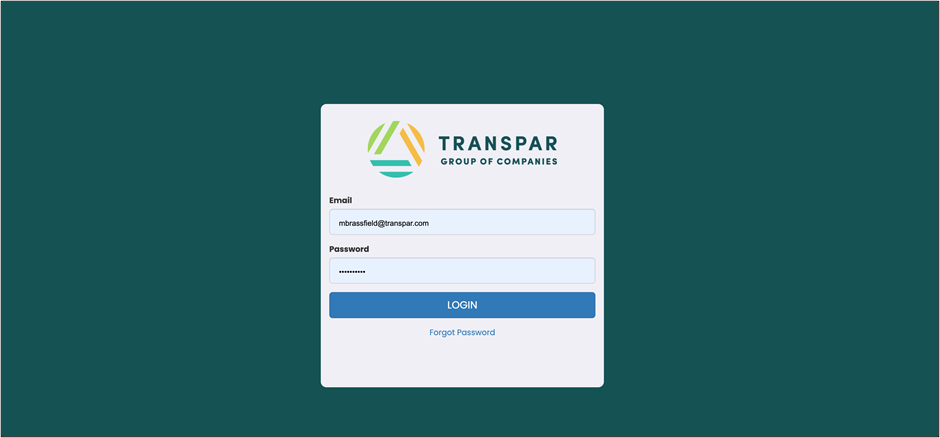
The user will enter their username and password. Usernames will be an email address and initial passwords will be created and emailed to the user before they login for the first time.
If at any point a password needs to be reset, please follow the “Forgot Password” link at the bottom of the login dialog box.
IMS Dashboard Home Screen
When opening IMS, users will first come to the dashboard home screen seen below.

The top navigation tool bar in the dark green section shows the IMS modules/sections that the users has access to at their specific location. Standard IMS users will see “Tickets,” “Students,” and “Reports” on the left-hand side of the navigation bar and will see the “Help,” “Settings,” and their personal account/profile menu options on the far right-hand side of the toolbar.
In the gray section below the dark green navigation tool bar, users will see the title of the module/section of IMS that they are currently in. When in “Tickets,” on the far right-hand side of the gray section, the user will see the following options/buttons:
- “Create Ticket” – Will allow the user to create a brand new IMS ticket
- “Mine” – Will change the dashboard in the white section to display either “Open” or “Closed” tickets that are currently assigned to that specific user, based on if they also have “Open” or “Closed” selected
- “All” – Will change the dashboard in the white section to display either all “Open” or “Closed” tickets, based on if the user also has “Open” or “Closed” selected
- “Open” – Will display “Open” tickets either assigned to that specific user, if the user has also selected “Mine,” or all “Open” tickets, if the user has also selected “All”
- “Closed” – Will display “Closed” tickets either assigned to that specific user, if the user has also selected “Mine,” or all “Closed” tickets, if the user has also selected “All”
Creating a New Ticket
Click the “Create Ticket” button in the top right-hand corner of the screen to access the blank new ticket screen seen below. Sections with red titles and light pink text boxes represent those that are required fields.
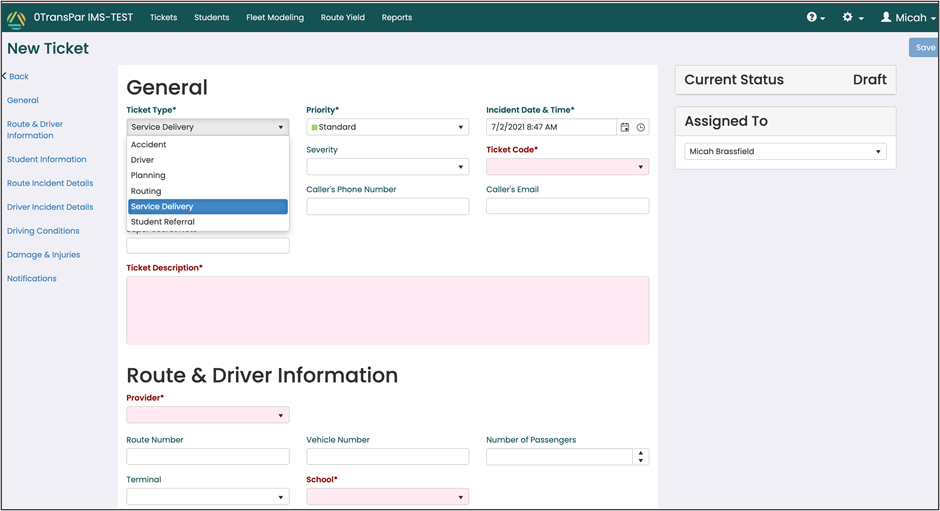
Begin by selecting the “Ticket Type” dropdown menu and selecting one of the following options:
- Accident – for issues pertaining to a preventable, non-preventable accident, collision or damage to a vehicle
- Driver – for issues pertaining specifically to a driver (e.g. complaint, no-call/no-show, etc.)
- Planning – for issues impacting operational planning (e.g. student not riding, bus stop request, etc.)
- Routing – for issues impacting the structure of a route and/or those that will need to be addressed by a router
- Service Delivery – for issues impacting service to students, parents and campuses (e.g. construction, late buses, etc.)
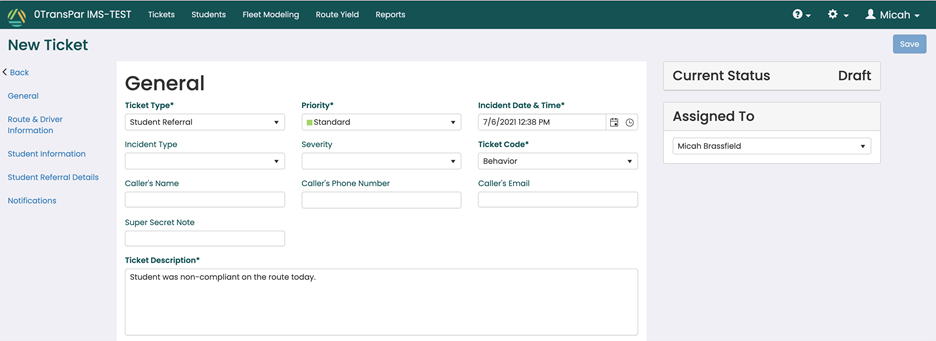
- Student Referral – for issues pertaining specifically to student behavior (e.g. non-compliance, eating/drinking on bus, etc.)
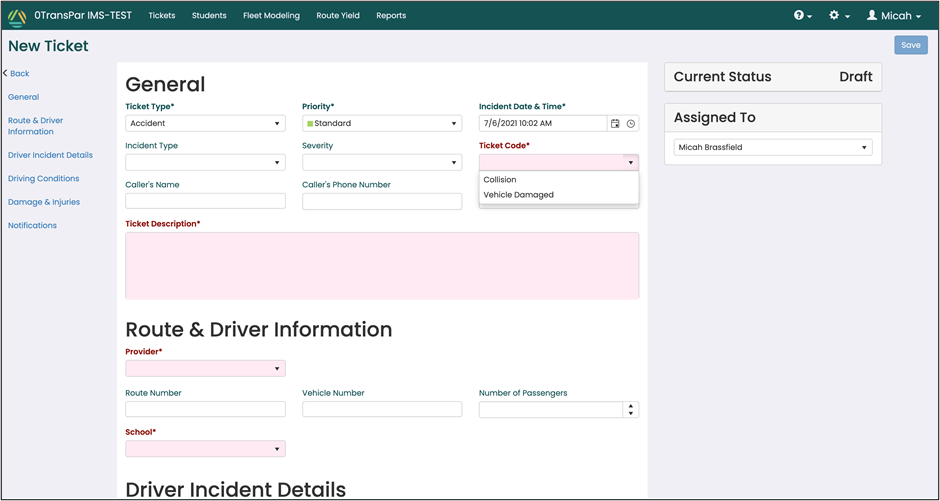
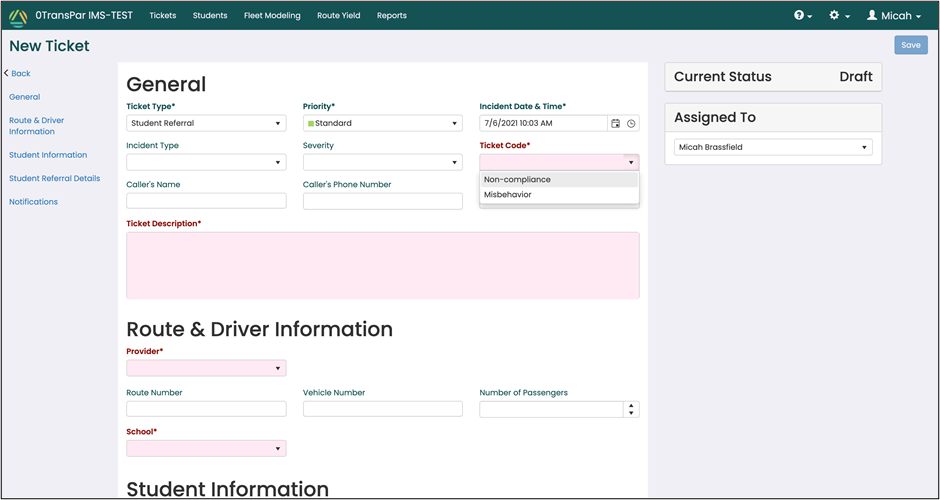
Notice that as a different “Ticket Type” is selected, it also changes the required sections to complete, as well as the ticket navigation links on the left-hand side of the page. Additionally, based on the selected “Ticket Type”, corresponding “Ticket Codes” will automatically populate.
Accident Ticket Type Screen and Navigation links:
Driver Ticket Type Screen and Navigation Links:
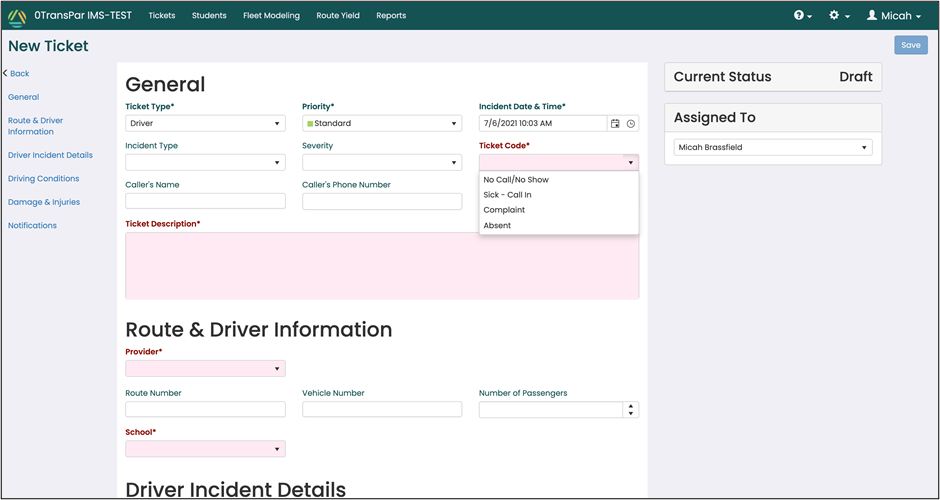
Planning Ticket Type Screen and Navigation Links:
*Note that the Planning and Service Delivery Ticket Types will allow the user to access ALL TICKET CODES in the system.
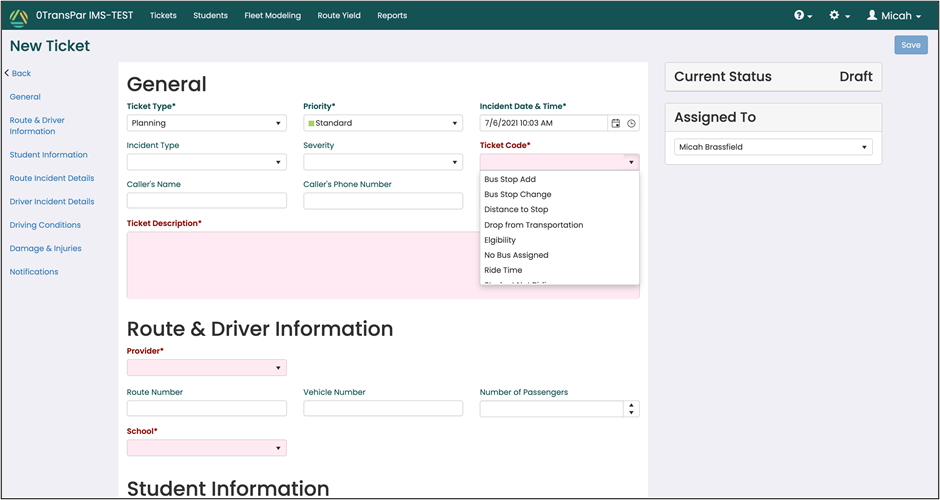
Routing Ticket Type Screen and Navigation Links:
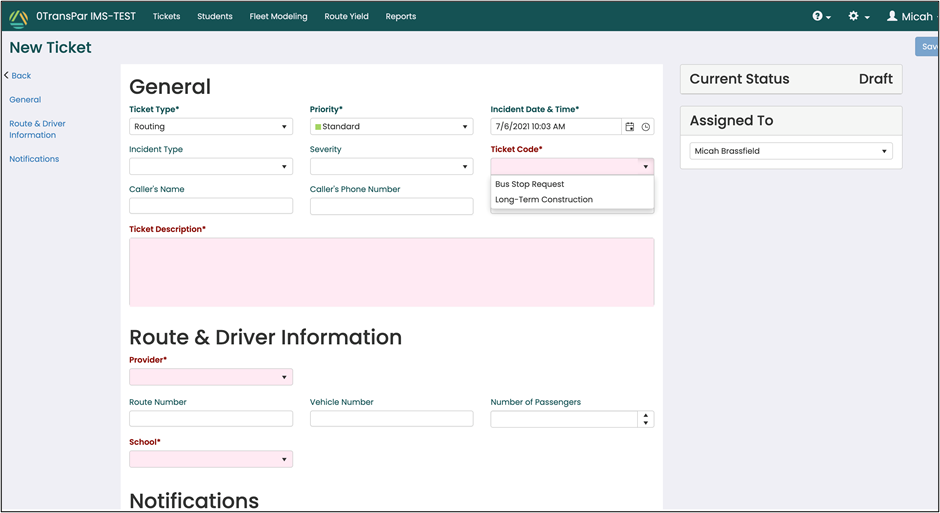
Service Delivery Ticket Type Screen and Navigation Links
*Note that the Planning and Service Delivery Ticket Types will allow the user to access ALL TICKET CODES in the system.
Adding Ticket Codes to a New Ticket Type:
When selecting a “Ticket Type,” if the “Ticket Code” section displays the message – “This ticket type requires codes be created for it in the system setup. Click here to configure them.” – follow the prompts in the “here” link in order to set up the Ticket Codes preferred for this Ticket Type. If a user does not have access to the system setup settings for IMS, they should notify their supervisor or IMS administrator.
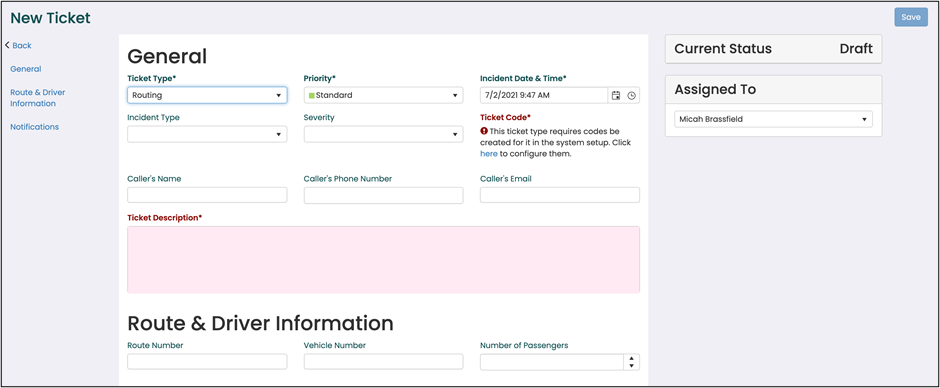
All sections highlighted by red titles and pink text boxes must be completed in order to save and submit a ticket. When all required sections have been completed, click on the blue “Save” button at the top-right hand corner of the screen.
Assigning Priorities:
Critical: Hazardous or urgent issues that require immediate action. These should be communicated to the Director of Transportation or designated supervisor as soon as the information is collected from the caller. Some examples of Critical priorities include:
- Bus breakdowns and accidents
- Missing student
- On-bus violence, physical injury or weapons
- Passenger medical emergencies, such as seizures, unconsciousness and similar medical concerns
- Bus passenger over-loads
- Bus no-shows
- Dangerous bus run paths
- Dangerous school loading practices
- Bus stops or student crossovers to and from stops that are an immediate danger
Important: Important issues are those that impact the immediate levels of service delivery. Most will require several days to remedy; judgement is required as to the immediate need or ability to provide a response. For instance, a bus badly delayed due to a serious traffic situation or road construction may also warrant contacting the transportation office immediately so that the appropriate school can be notified. Some examples of Important priorities include:
- Students without a bus or bus stop assignment
- Very late school arrivals
- Lengthy loading delays at school loading zones
- Stop sequences that are badly aligned
- Bus run paths or route linkages that cannot be achieved within the allotted time window for a given bus
Standard: These are lower priority issues that require action but should not supersede “Critical” or “Important” concerns. Depending on the volume of requests and the time of the school year, these may take several days or more to review and resolve. Some examples of Standard priorities include:
- Change request for existing stops which are not hazardous
- Parent cannot see child at the stop from his/ her residence
- Refinements to bus run times and/or street path directions
- Route modifications due to traffic congestion
- Requests for alternate pick-up or drop-off locations, such as a daycare
- Change in student’s residence location
- Driver discipline or attitude
Informational: This should generally be used far less than most incidents and complaints, as most similar calls will either be placed in the standard priority or present themselves as opportunity to be immediately addressed on the phone with the caller. Immediate questions, such as, “Where does my child get the bus?” should be able to be answered during the call and it is unnecessary to record in the IMS system; however, a question of this type could be categorized as Informational if the transportation staff member taking the call does not have the information readily available, but knows that it can be located easily and resolved in a relatively short timeframe. An example of where the Informational priority might be assigned would be a school notifying that their planned dismissal time will change in the future, an unplanned school schedule deviation like an early dismissal, a parent notifying transportation that a child may not ride, and other similar notifications.
Hold: This category is rarely, if ever, used. Certain situations may require a call-back where more information is needed to complete the ticket. If the ticket is classified as “hold”, the assignment should be made to the staff employee taking the call until such time as the information can be obtained. Then, the appropriate priority should be assigned.
Incident Date and Time:
The “Incident Date and Time” section will automatically default to today’s date and time. If needed, users may also go back and adjust the date and time to capture a past incident that needs to be logged in the IMS system.
Ticket Assignment
Tickets should be assigned to the user who is most appropriate to address the issue. To assign a ticket, use the “Assigned To” dropdown menu on the right-hand side of the screen as seen below:
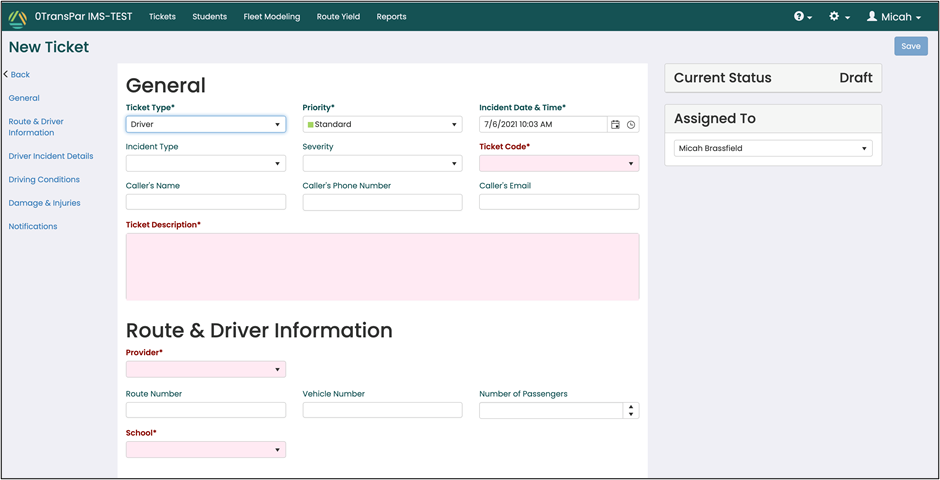
Current Status and Feed:
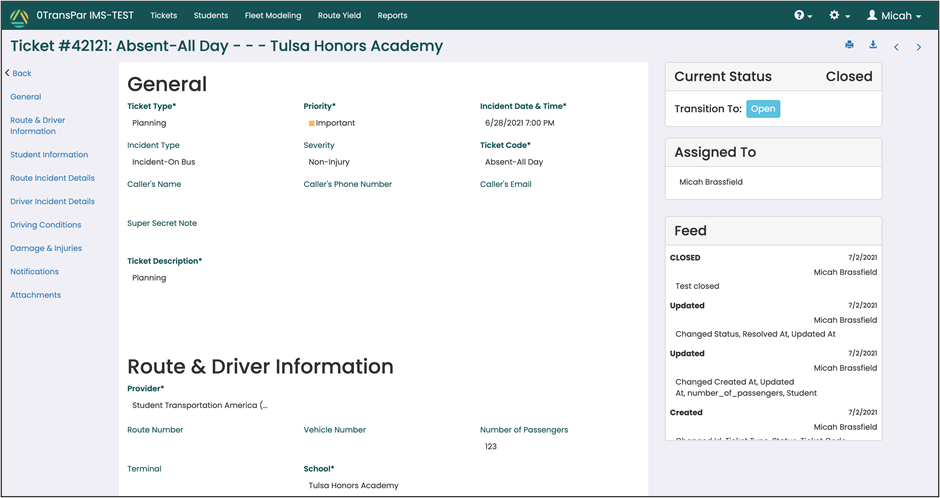
After a ticket has been created, in the top right-hand corner of the screen under the “Save” button, the “Current Status” of the ticket will be displayed as either “Open” or “Closed”. Beneath the “Assigned To” section, the ticket “Feed” will be displayed, which will capture all of the updates and changes to tickets in real-time so that the user knows what was last changed within a ticket.
Open tickets will still be editable and look like the “Open” ticket seen below:
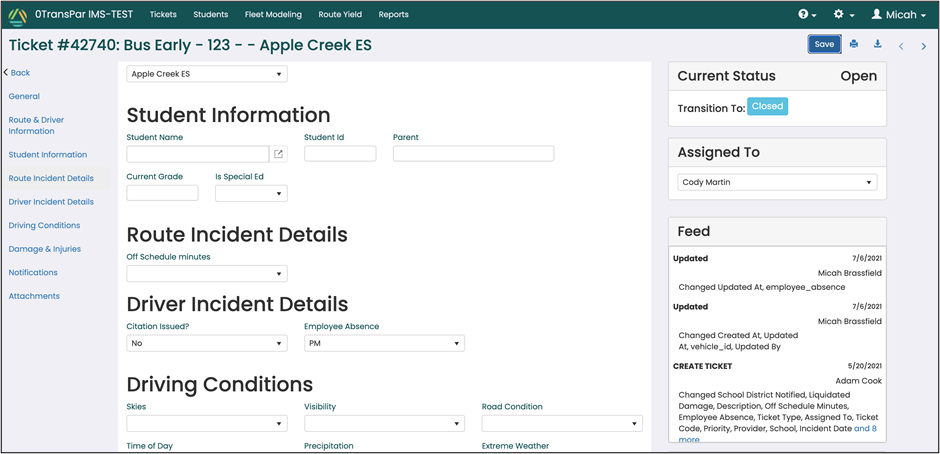
Closed tickets will NOT be editable and will display in a PDF-style as seen below:
Closing a Ticket
After the incident/issue has been fully resolved, the ticket needs to be “Closed.” To do this, click on “Closed” button in the “Current Status” box next to the words “Transition To”. The ticket will now appear in a PDF-style format that will not allow the ticket to be edited.
Re-Opening a Ticket:
To re-open a ticket for, users will use the same “Transition To” section to move the ticket back from “Closed” to “Open”.
New Student Management/Referral Module:
In IMS 2.2.1, a “Student Referral” Ticket Type was added, which also ties to the “Students” section in the dark green navigation tool bar. When selecting “Student Referral” as the ticket type, the corresponding “Ticket Codes” that the location creates for this ticket type will be available in the ticket code dropdown menu, similar to what is seen below:
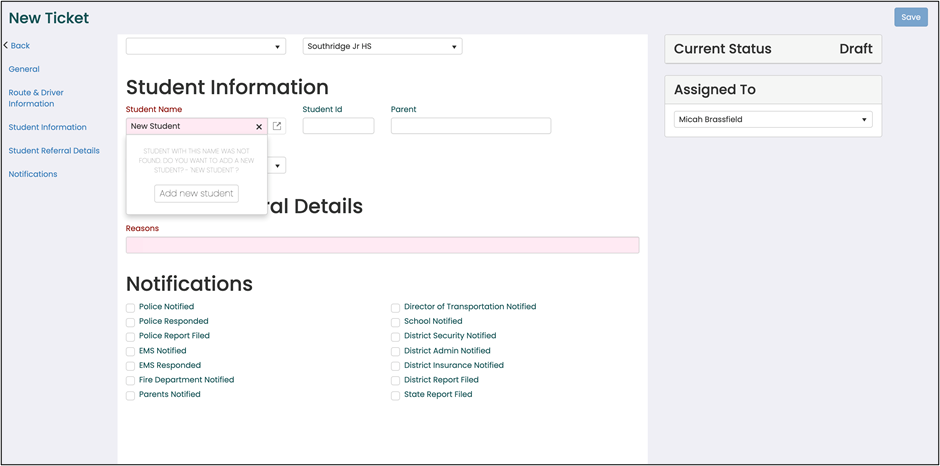
The additional required fields when entering a “Student Referral” ticket type are the “Student Name” and “Reasons” for the referral. When you type in a student’s name for the first time, you will be prompted with the following message: “ Student with this name was not found. Do you want to add a new student? Add New Student”. Once you add a new student, it will be saved in the “Students” database which is accessible via the “Students” link in the dark green section of the navigation tool bar.
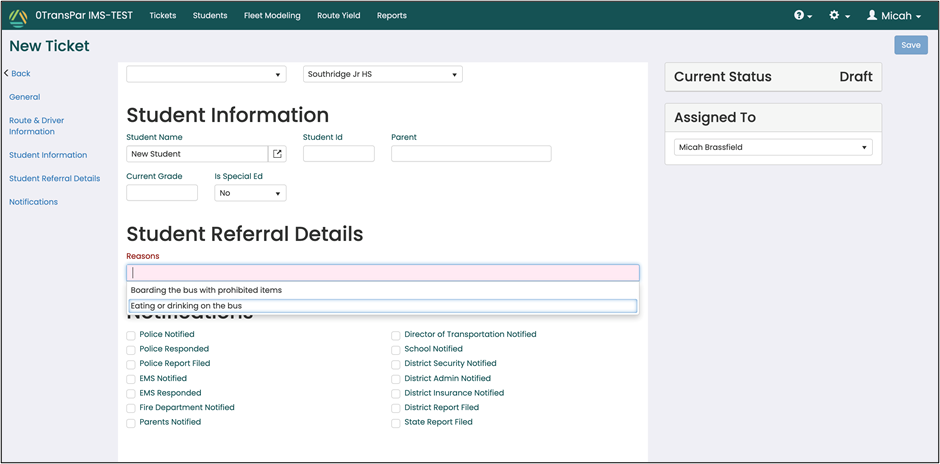
Student Referral Details will allow the user to select “Reasons” for the referral from a list of options within the location’s settings. This list can be added to or edited in the System settings.
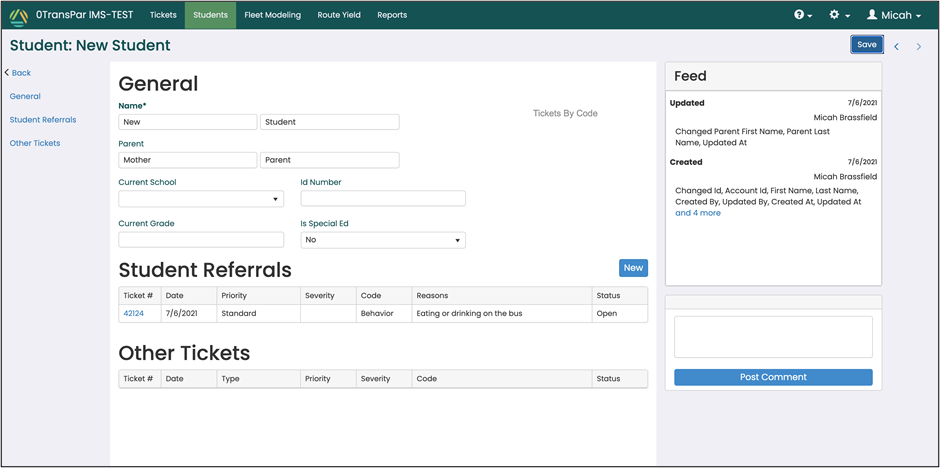
Once a “Student Referral” ticket is saved, the user can review all student referrals in the “Students” link at the top of the navigation tool bar.
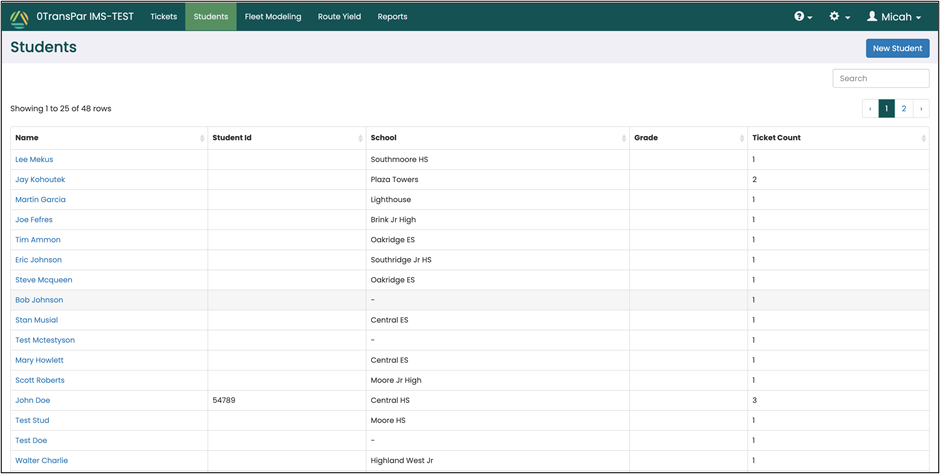
To access a specific student, the user can click on a specific student’s name or search for the student’s name in the top right-hand corner of the screen. Selecting a specific student will open that student’s particular record, which will track the number of referrals, date of that referral, and other student information as seen below:
Reports
IMS 2.2.1 includes a robust reporting tools under the “Reports” link in the dark green navigation toolbar. When a user clicks on “Reports” it will take them to the screen shown below:
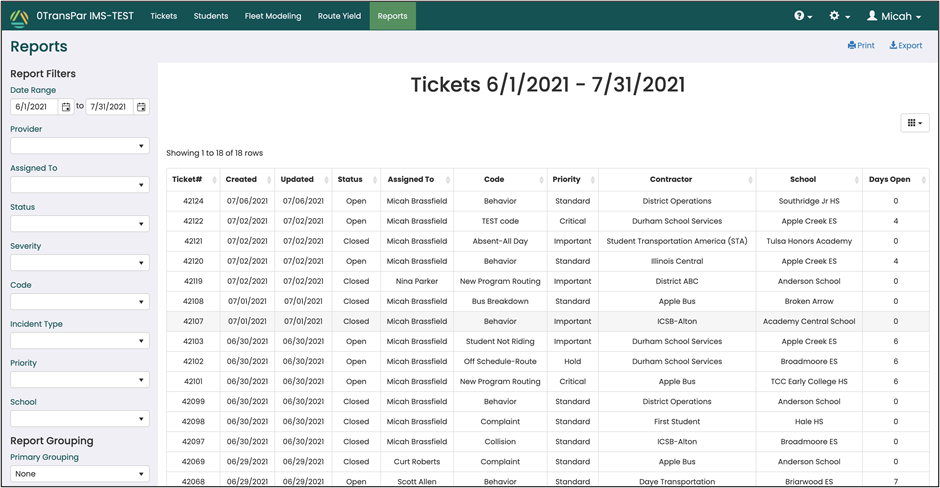
The default screen for the reports page will show a list of tickets for the specified date range in the top left-hand corner of the page. The date range can be customized by clicking on each of the calendar icons.
Users can customize the initial “Reports” dashboard by clicking on the waffle icon underneath the word “Export” on the top right-hand side of the screen. By checking or unchecking the boxes in the waffle dropdown menu, it will change what information is displayed in the center section of the “Reports” dashboard:
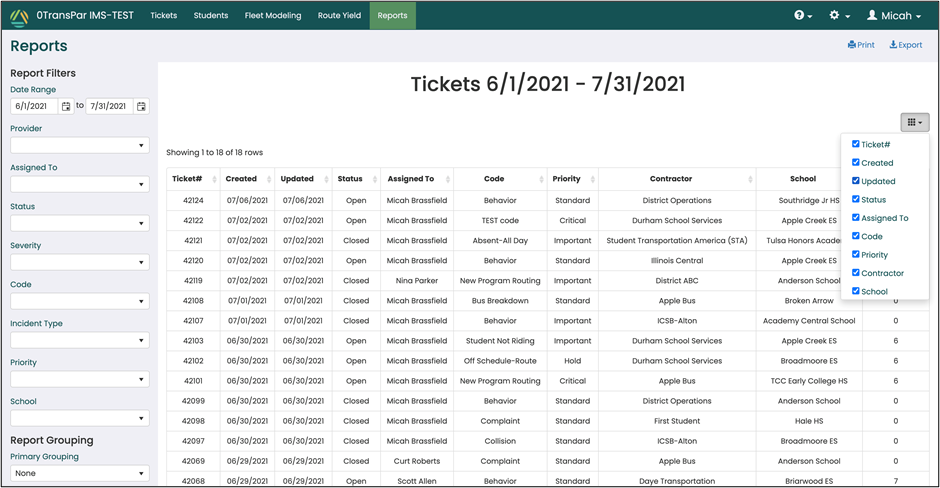
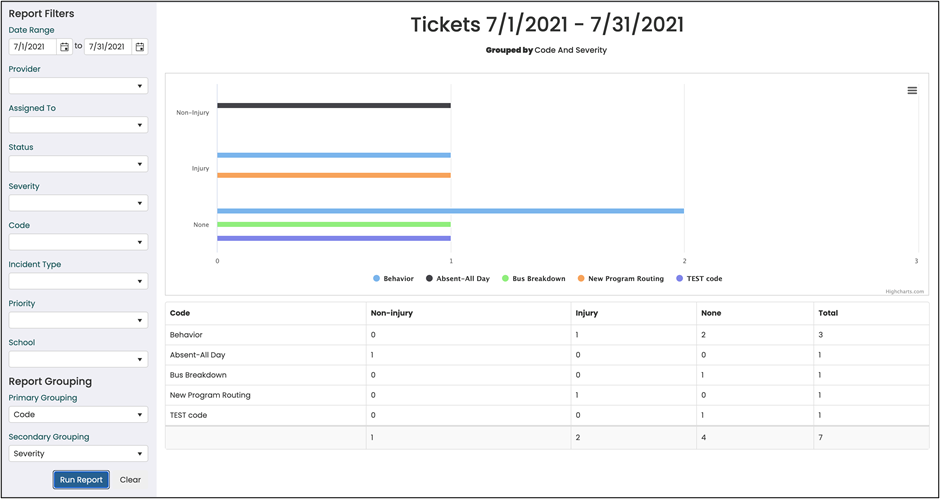
To generate a list of specific tickets in the dashboard, users may select details for any of the following categories – Provider, Assigned To, Status, Severity, Code, Incident Type, Priority, or School – and hit “Run Report” to update the list with those parameters.
If the user would like to see charts and graphs to report visually on the information, they may select a primary grouping of the information that they would like to see displayed, and can also add a secondary grouping, if more granular detail is requested:
Primary Grouping Example:
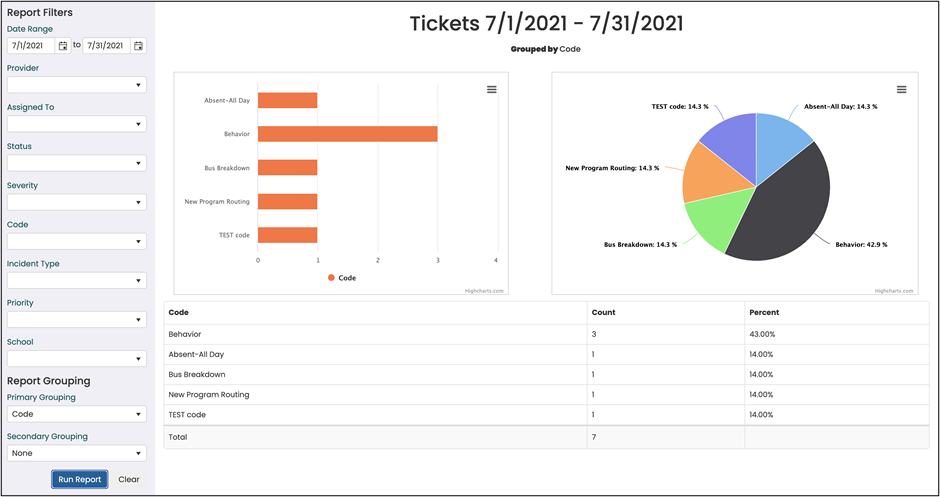
Secondary Grouping Example:
Adding a New User
To add a new user, for users with administrative access, they will click on the gear in the top right-hand corner of the IMS Dashboard Home Screen and click on “Users”.

Clicking on the “Users” link will take the administrator to the page below, where they will then need to click on the + sign next to the word email to start the process of adding a new user.

By clicking on the + sign, a “New User” dialog box will open. It will require the valid email of the user to be entered, a password to be created with at least one number and one capital letter, and the new user’s first and last name.

Once all of the new user field are completed, the administrator will need to click the submit button, and it will take them to the final set-up steps.
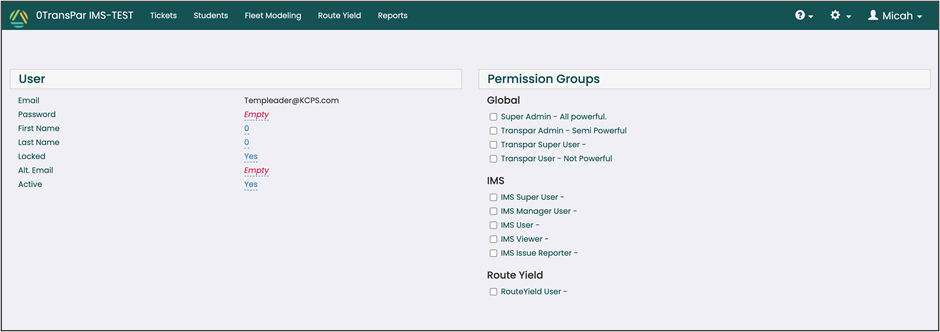
The administrator will need to select one of the following based on the level of access being granted to the new user:
IMS Super User: Grants full administrative access to the system, with the ability to add users, manage IMS settings, and submit tickets.
IMS User: Grants access to submit tickets and view tickets within the system.
IMS Viewer: Grants access to view tickets only.
Note: IMS Manager and Issue Reporter are currently only used for specific locations and TransPar internal purposes only.
The administrator will also need to check BOTH district boxes, as one is assigning the user to the location and the other is assigning the access to IMS at the appropriate level.
Help and User Support:
For technical issues and assistance, to have a new account created, or for other general questions, please speak with your onsite TransPar representative first, or utilize the “Help” tool via the button with the ? at the top right-hand corner of the screen.
This manual is available and will be updated in the “User Guide” link in the Help dropdown menu.
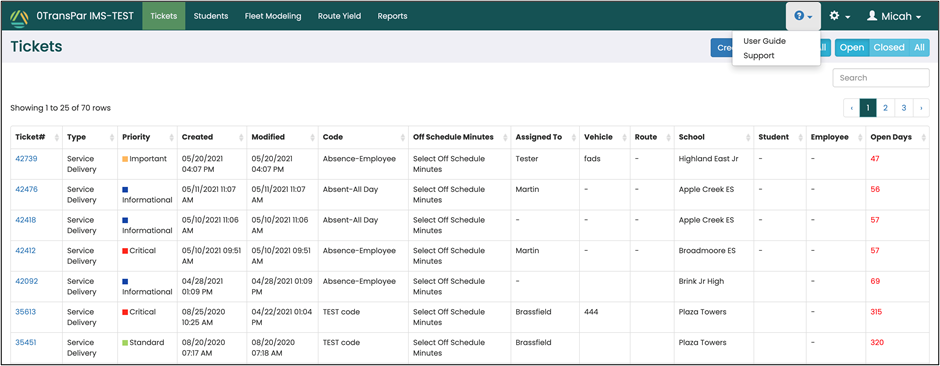
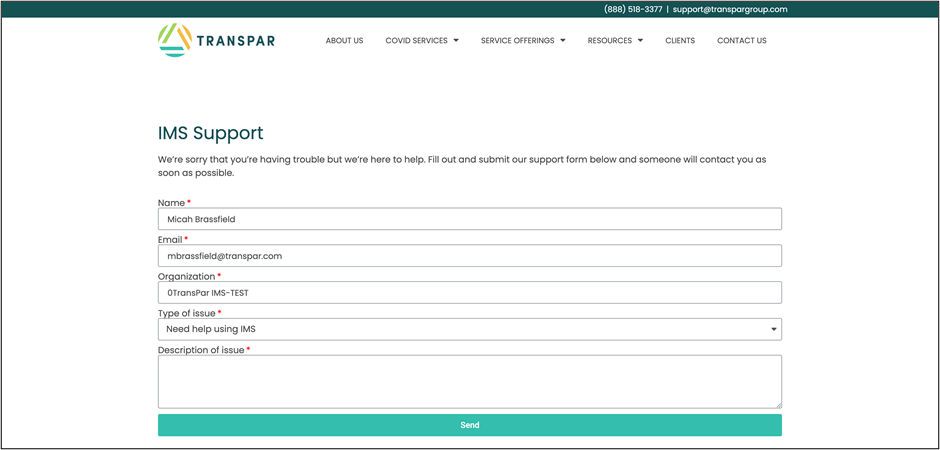
To access more direct support, select the “Support” link which will bring you to the form below where assistance can be requested for a specific issue. A member of the TransPar support team will contact you within 24 hours regarding this request.
